How to Build a Cedar Hot Tub
February 14, 2023
A Step-by-Step Guide to Assembling a Forest Cooperage Hot Tub
Wondering what it takes to assemble a natural wood hot tub? In this guide, we’ll explain how to build a cedar hot tub so you can be prepared before your tub arrives.
Choose your ideal location, prepare your foundation, and get ready to build something you’ll be proud to have for years to come.
Cedar Hot Tub Assembly FAQ
What supplies do you need?
To assemble your hot tub you’ll need a helping hand from a second person and the following tools:
- Impact Drill
- Robertson drill bit
- 9/16” deep socket or a deep ratchet
- Vice grips
- Cedar shims
- White Rubber mallet
- Tape measure
- 5/32” drill bit
- Tape
- 80 Grit Sandpaper (optional)
Do you need any special skills?
If you feel comfortable using the tools listed above, you should feel confident in your ability to assemble your hot tub. Depending on the size of your tub, the heaviest pieces will weigh about 50-60 lbs depending on the size of your tub, so you’ll need to be able to lift these between two people.
All the materials will arrive ready to assemble, along with detailed instructions to walk you through it step by step. If you run into any issues, you can reach us by phone at 1-877-557-1961.
If you’re not comfortable assembling the tub yourself, you may want to engage the services of a deck builder, carpenter or contractor comfortable with building foundations and working with wood.
We do recommend hiring a professional to help with plumbing and electrical (if needed), and in some cases, you may want to hire a contractor to help you build your foundation.
How long will it take?
Once your foundation is ready to go, your hot tub can be assembled from start to finish in a day, though you may choose to take your time and spread it out over a couple of days if you’ve ordered a skirting kit, jets or other accessories.
What’s the best location for a hot tub?
The first thing you should do is check with local authorities to make sure a hot tub is allowed on your property. In many jurisdictions, permitting is required for hot tubs and swimming pools, so it’s best to do your research before taking the plunge (pun intended).
If you’re going with a wood-burning option, choose a location where you can safely light a fire, away from any tree branches, powerlines, buildings or other fire hazards. When in doubt, reach out to your local authorities to ensure you can place your woodstove where you want it.
Once that’s taken care of, as long as you have access to water, drainage, electricity if required and the ability to build a foundation (more on that below), you can put your hot tub just about wherever you like on your property.
If you have several options to choose from, it pays to strike a balance between beautiful views, privacy and convenience. Our cedar barrel hot tubs can be an attractive feature in your landscape design so there’s no need to hide them away.
One last tip: tubs located closer to your home have a tendency to get used more often than those that are tucked away out of sight, but this isn’t a hard and fast rule!

How to Build your Hot Tub Foundation
Before you assemble your hot tub, find yourself a prime location and prepare your foundation. Once filled, your hot tub will weigh thousands of pounds, so you’ll need to start with a rock-solid foundation. Your base must be level, strong and built for the long haul; a weak foundation could cause your tub to shift and leak over time, so this is not the place to cut corners.
In an ideal scenario, we recommend pouring a concrete foundation. Taking into account both function and esthetics, form a square, circular or rectangular slab, adding an extra allowance for your equipment box, external heater and skirting package if required. Pour the pad slope to ⅛-¼” per foot to allow for drainage, or install a center drain in the pad.
Many of our customers have had success with the following method for building a foundation without concrete:
- Excavate down to mineral soil or clay
- Fill with a layer of sand followed by crushed rock or gravel and top with another layer of sand
- Compact and level the base
- Arrange concrete pavers, levelling them on a slight slope to allow for drainage
If you have a very firm, flat surface, it may be possible to lay your foundation without digging down into the soil. Concrete pavers can be arranged in a circle under the 4×4 cedar chine joists that support the tub, each levelled with a shovel before laying down the base. Our smallest tubs can even be placed directly on firm ground.
It is also possible to place your tub on a well-built platform but we recommend working with a professional to calculate the load-bearing capacity. In most cases, a sunken tub built into a deck provides an attractive and more cost-effective alternative.
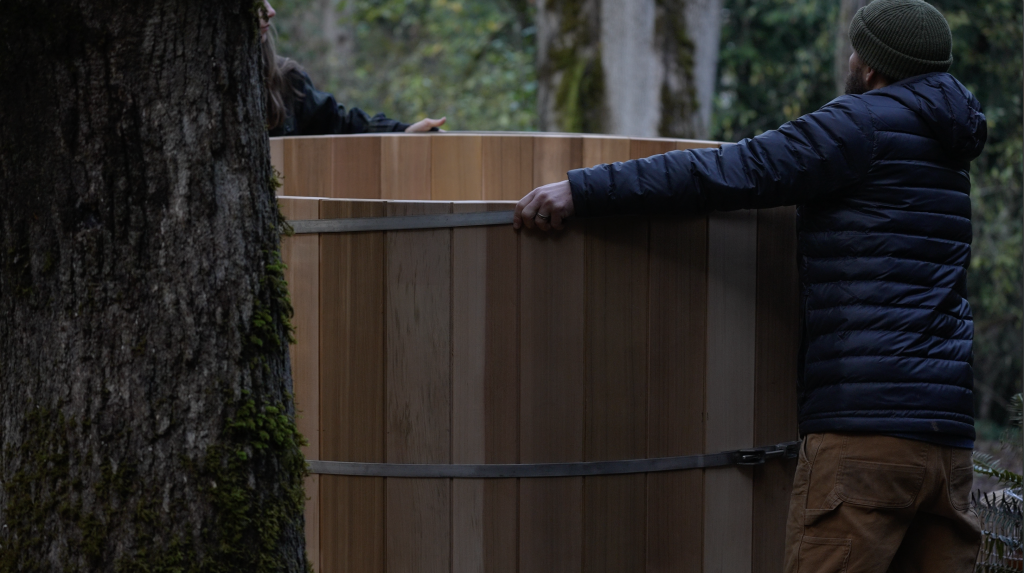
Assembling Your Cedar Hot Tub
Once you’ve built your foundation you’re ready to assemble your hot tub. What does that look like exactly?
In this video, we walk you through it visually, step by step:
Your Forest Cooperage hot tub will come with detailed instructions, and we strongly recommend reading them thoroughly before getting started. Here’s an overview of what you can expect.
Step 1: Organize Your Supplies
Your hot tub will arrive flat-packed in a plywood crate. Be sure to store it somewhere dry as it is critical to avoid getting the wood wet. Should the cedar boards get wet before the tub is assembled you may run into issues with fit, so keep an eye on the weather and plan to build your tub on a dry day or under shelter.
When you’re ready to start building your tub, unpack and organize all of your components and tools at the site. Take care to avoid laying the wood down on gravel or other rough surfaces. The cedar is soft and could get pressure marks or scratches if unprotected
Step 2: Build the Base
Building your tub begins with a base. Layout the 4×4 chine joists and connect them with deck screws to the locator boards. Once the base is assembled, check its level and adjust it if necessary. Cedar shims are ideal for this.
Step 3: Install the Drain
Install the drain into the pre-drilled drainage hole in the floor using the PVC primer and glue provided.
Once the drain is installed, you’ll build the floor. Connect the two halves of the floor by lining them up using the pre-placed dowel included on one of the halves, then tap them together with a rubber mallet.
To complete the base, you simply need to center the floor on the 4×4 joists. No screws are required as the weight of the water will hold the tub in place, but it is important to center the floor on the base so that the weight is evenly distributed.
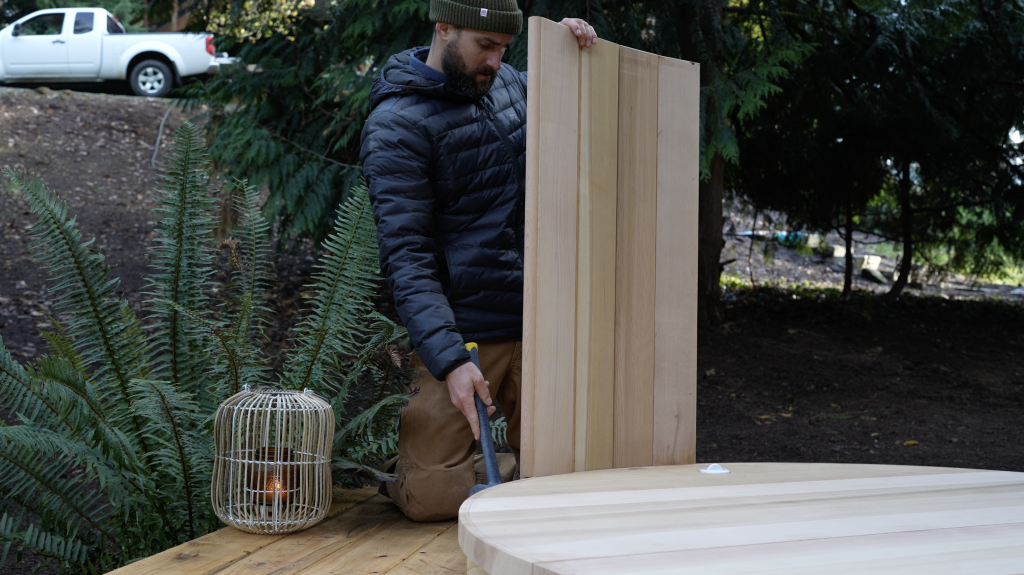
Step 4: Assemble the Staves
With the floor in place, it’s time to build the walls. Here is where proper technique really counts. If done correctly, you’ll end up with a nice snug fit and minimal leakage from the start.
The walls are made up of individual ‘staves,’ narrow lengths of vertical grain cedar with profiled edges, designed to interlock.
You’ll start by locating the first stave, which will be labelled #1. Find the center mark on the floor of the tub and put the first stave into place. From here work counterclockwise, gently tapping each stave into place by hand or very carefully with a rubber mallet. As you go, follow the pencil line on the floor, maintaining an ⅛” distance from the line to ensure there’s room to fit the last stave.
As you assemble the walls, you may want to use masking tape to hold the staves in place, particularly if it’s a windy day. The walls are not secured into place individually, so until the walls are fully connected there’s a risk they could tip over.
With correct technique, the final stave will fit perfectly into place, but if the gap is a little too wide or too narrow it can always be adjusted by taking out several staves and replacing them a little bit closer to or further from the pencil line.
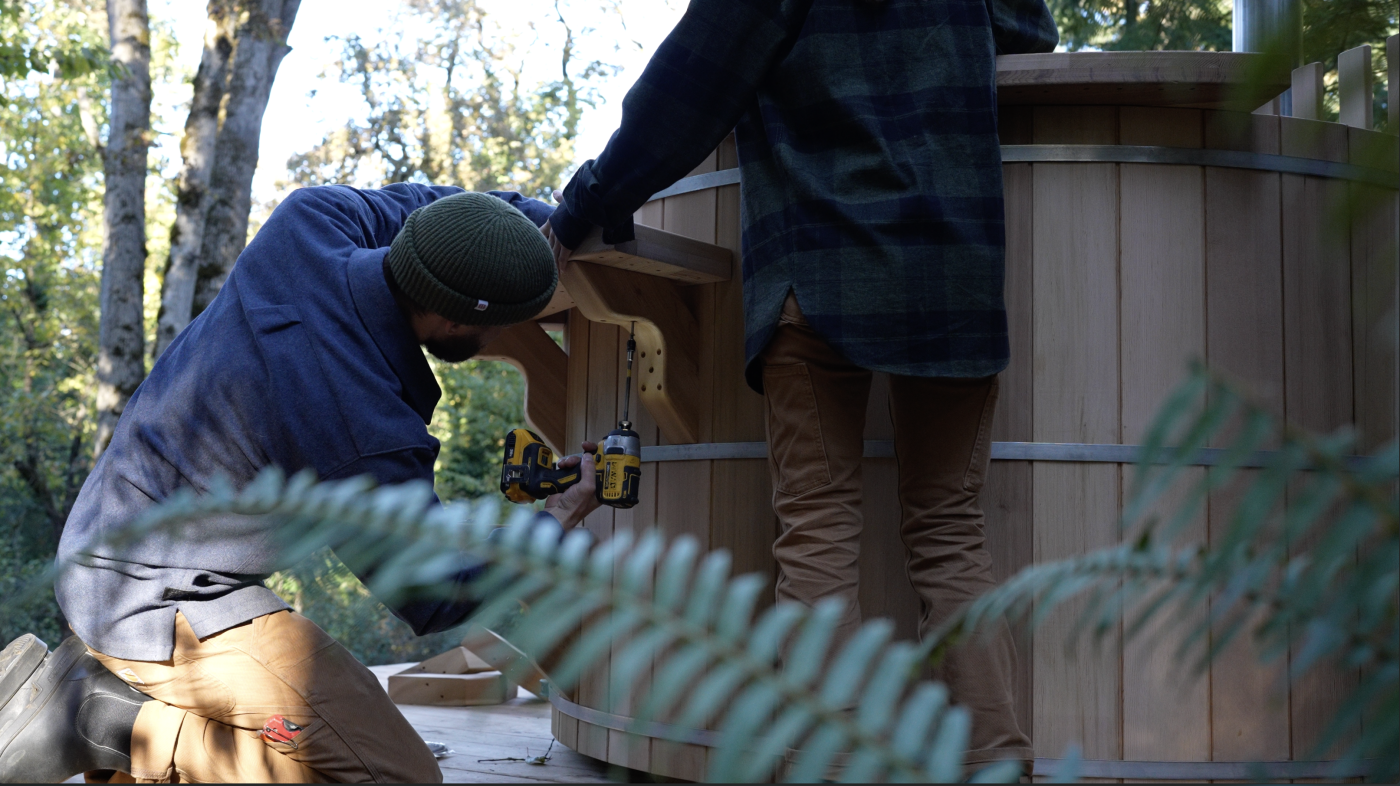
Step 5: Secure the Hoops
The time has come to secure the walls in place! This is the step where a second set of hands really comes in clutch, so if you haven’t yet, go ahead and call in reinforcements.
Your hot tub will come with three or four stainless steel hoops, depending on the height of your tub, each made up of two or more lengths of steel, depending on the size. Start by loosely connecting the lengths together using the rods and nuts provided.
Next, you’ll slide the bottom ring into place. Measure 2¼” from the base of the staves, using the provided spacer block, and working together with your second person to hold it in place, connect the ends of the hoop and tighten the nut just until the hoop will stay in place. If you don’t have a partner you can get away with using blocks to hold the hoop in place as you go, but be careful not to damage the wood.
Beginning with stave #1, use a rubber mallet to knock the staves into a slightly tighter radius, working your way around 2-3 times and tightening the hoops evenly until the rod and nuts cannot be tightened anymore.
Finally, put the remaining hoops into place using the measuring guide provided with your tub, and tighten the rods and nuts to the same distance as the bottom hoop. This will ensure a nice, even distribution of pressure. We recommend you place the hoop connections according to our spacing guide to ensure the best seal. Some people prefer to stack the hoop connections vertically. Aesthetically, this looks quite nice, but the best practice is to stagger them to ensure forces are applied evenly across the tub.
Step 6: Assemble the benches and accessories
If you’ve ordered benches, steps, a skirting kid or an electrical box, now is the time to assemble those. As with the hot tub itself, it’s important to keep all wooden accessories dry until fully assembled. Once again, be sure to read and follow the instructions provided to avoid any issues down the road.
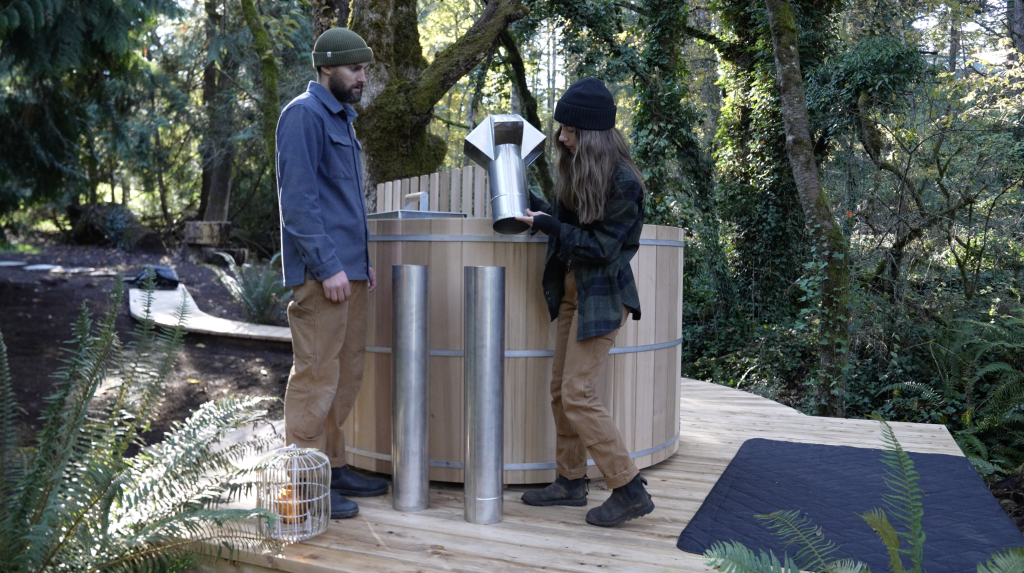
Step 7: Install your heater and plumbing
You’re nearly done! At this point you can rest assured that your tub is ready for the elements, so now would be a good time to take a break and admire your own handiwork.
Of course, your hot tub won’t get very hot without a heater so you’re not quite done yet. If you’ve chosen a wood-fired option, carefully follow the instructions for safe installation and use.
If you’re using an electric heater, all electrical connections must be made by a qualified spa service technician or electrician.
Our hot tubs can be filled directly from a hose, but if you’re installing jets or a more complex water system, we always recommend hiring a local spa technician or plumber to complete the installation.
Using Your Hot Tub for the First Time
You might be surprised to learn that even if you’ve done everything perfectly, your brand-new hot tub will leak the first time you use it. In fact, it will probably leak a lot. This is all part of the process!
Your hot tub is made from kiln-dried cedar, which means the moisture has slowly been removed from the wood causing it to shrink. When the wood is wet, it will absorb moisture and expand to form a tight fit between each board. This is how we achieve a water-tight seal without needing to add metal or plastic liners, which means there’s nothing between you and the natural wood.
Altogether the sealing process can take 1-6 weeks of constant exposure to moisture, but you don’t necessarily need to wait this long to use the tub. The colder the water, the longer it’s likely to take the tub to swell and seal.
To seal your tub, start by adding a couple of inches of water to seal the floor first. You can fill it quickly until you have a few inches of water in the tub. At that point, turn down the flow so that you are holding the water level; the tub is in equilibrium with gaining water and losing it. As the floor swells and seals with the vertical staves, the water level will start to rise. Once the floor is sealed you can start to gradually increase the volume of water. When the tub will hold water with minimal leaks, drain it, rinse out any sediment and refill the tub.
There may still be a few small leaks at this point but it’s safe to start using your new hot tub as long as you can maintain an inch of water over the top of your woodstove or over the lower suctions in an electric tub.
You can expect a tea-like colour to develop in the water from the natural tannins in the wood. This is completely safe to bathe in but be aware, the tannins may stain light-coloured swimsuits. Over time the colour will diminish as you empty and refill the tub.
If you have an abundant water source, you can change the water every 48 hours or so for chemical-free bathing. With a sanitation system, we suggest the following initial protocol:
- Fill and hold water for one week. Drain.
- Fill and hold water for two weeks. Drain.
- Fill and hold water for 3 weeks. Drain.
- Begin a regular quarterly schedule of changing the water.
Cedar Hot Tub Assembly Tips
Follow these rules and you’ll be well on your way to many years of successful soaks in your new cedar hot tub.
#1 Lay a solid foundation. Make sure your base is level, provides drainage and can support thousands of pounds of weight without sagging or breaking down
#2 Keep your hot tub package dry until fully assembled. Wet wood will swell, so don’t take any chances and keep your kit nice and dry.
#3 It’s more fun with friends. It’s helpful to have a second set of hands to assemble your tub, so call in a friend–no professional carpentry skills required.
#4 Give it time. The first time you fill your tub it will leak. This doesn’t mean you’ve done anything wrong, it’s all part of the process of working with natural wood. Be patient, add more water as needed and your tub will soon be good to go.
#5 Read the Instructions. By now you have an idea of how to build a cedar hot tub, but don’t underestimate the importance of following the directions that come with your specific tub, step by step.
If you have any questions about what it takes to build a cedar barrel hot tub, or if you run into any difficulties in the process, we’re here to help! You can reach us at 1-877-557-1961 or [email protected].
